Last modified: Monday, September 12, 2005
Home balance training directions
Safety:
- Consider performing the exercises close to a soft surface or near a chair or other supportive object.
- Perform them on the hardest surface available.
- Position yourself so you have a spot on which to focus, preferably something at eye height on an opposite wall.
Time:
- Study participants were asked to practice the poses for 15 minutes a day, four days weekly, for six weeks. The daily practices could be spread out throughout the day, as long as five-minute segments were devoted to each pose. One pose could be practiced in the morning, for example, with the two remaining poses performed later in the day.
- The poses can be performed alone or as part of a fitness regimen.
Basic poses:
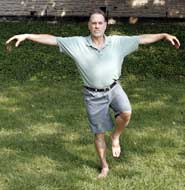
Forward knee lift. Watch
- Begin with both feet flat on the ground about shoulder width apart.
- While placing all of your weight on your right leg, lift your left knee. You can start by lifting in just an inch or two, but gradually lift it higher.
- The target position is when the knee is in the air and the upper thigh is parallel with the ground.
- Hold this position for as long as you can, a maximum of 15 seconds, and then alternate legs.
- Continue alternating for five minutes.
- Once you are able to hold the position for 15 seconds you may move on to the next progression.
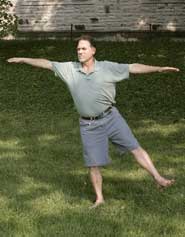
Side leg lift. Watch
- Begin with both feet flat on the ground about shoulder width apart.
- While placing all of your weight on your right leg, lift your left leg straight out to the side. Try to keep the leg you are lifting straight.
- The target position is when the leg is lifted straight out to a 45 degree angle. Do not lift higher.
- Hold this position for as long as you can, a maximum of 15 seconds, and then alternate legs.
- Continue alternating legs for five minutes.
- Once you are able to hold the position for 15 seconds, you may move on to the next progression.
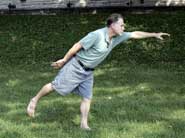
Stork stance. Watch
- Begin with both feet flat on the ground about shoulder width apart.
- While placing all of your weight on your right leg, reach forward with your right arm and lift your left leg straight back. Try to keep your back straight so that your outreached arm and back form a straight line. Your knees may bend slightly. Reach forward as far as you can.
- The target position is when both the outstretched arm and leg are parallel to the ground, forming a straight line.
- After you reach as far as you can, slowly return to the original starting position.
- Continue alternating arms and legs for five minutes.
- Once you are able to reach forward and then return to the original starting position without faltering, you may move on to the next progression.
Progressions:
- Each pose becomes progressively more difficult in the same manner. A more advanced progression can be attempted once you can successfully hold a pose for 15 seconds on each leg without the aid of a support and without flailing.
- The basic poses are described above.
- The first progression involves first performing the basic pose and then slowly turning your head from one side to the next during the 15 second period (Watch, https://newsinfo.iu.edu/pub/libs/images/usr/headturn2.ram).
- The final progression involves performing the basic pose and then closing your eyes for the 15-second period.
- Please review the directions frequently until you are familiar with the poses and progressions.